Commands
Manage
New
Create a new Configuration
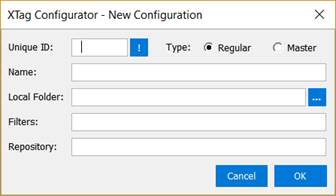
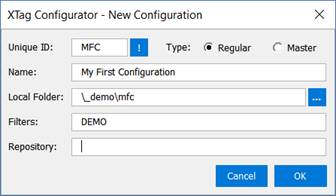
Unique ID
Enter an identifier (three letters are usually sufficient). Click on ! to check it is unused, otherwise that will be checked when you will click on OK
Type
Regular: Standard case, to address a Web Application
Master: To gather common tracking, then included in Regular Configurations
Name
Give your Configuration a descriptive name. It will be used as Title, in Configuration List, JS headers and Installation Tips.
Local Folder
Automatically populated with Unique ID as folder, but you can change it.
Filters
Enter a list of Filters separated by commas. They will be used in Configurations Filters.
Repository
If you have entered your Git settings, a repository is proposed for creation, you can adjust it. Otherwise, it remains empty.
Open
Open the Configuration Manager to select the Configuration(s) on which you want to work, or to Publish them by batch.
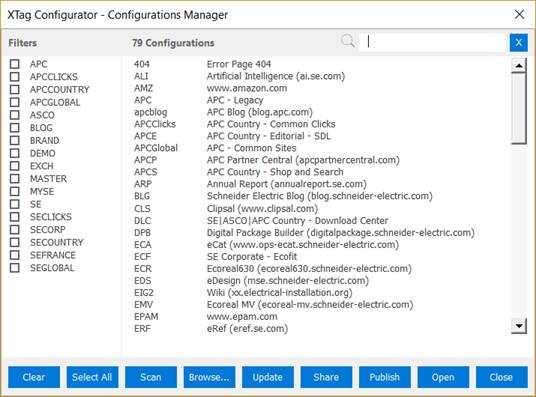
Search area
Type letters belonging to the description of the Configuration you are searching: the list is immediately filtered on those containing what you’ve typed.
Click on X to clear this area.
Filters
All the filters declared are gathered here. You can select more than one.
Clear
Clear Filters selection (Display all Configurations).
Select All
Select All the Configurations currently displayed.
Scan
Complete Configurations List by scanning local folder and subfolders.
It is useful when some Configurations have been copied manually, or after a Configurator update coming from a version <12.00
Browse
Browse any folder to add existing Configuration in the List, or to open some which are excluded from the list, like the Configuration templates.
Update
Complete List with Shared Configurations.
The process will download shared list and add the Configurations it contains in your local list when they didn’t exist.
Share
Add Selected Configuration(s) to the Shared List.
The process will download shared list, add into it those you have selected if they were not already present, then upload the completed list.
Publish
Publish Selected Configuration(s), after confirmation:
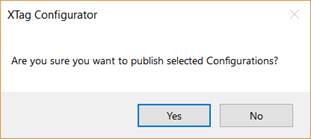
If, among the selection, there were Configurations in error state, or not in a state allowed to be published, you’re warned in the end of the process.
Open
Open Selected Configuration(s).
Close
Close this Dialog without action.
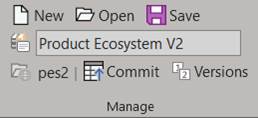
Save
Save current Configuration.
Title
Type the title you want to use for this configuration. It is used in generated Configuration File Header and Installation Tips.
Commit
Commit this Configuration in its repository.
Versions
List of all Commits and Publications, with Date and Author. See Versions.
Web Application
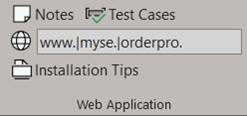
Notes
Open Web Application Notes about this Configuration: URLs, Credentials, Tickets (optional).
Test Cases
Open Web Application Test Cases used to validate this Configuration (optional).
Host Name Pattern
Define Production Host Name, used to automatically switch on PreProd Platform(s) when Page's Host Name doesn't match.
This must be defined to allow PreProd definitions (single PreProd or PreProd map).
Considered as a Pattern when ended or started by a dot (understood as “Starts with” or “Ends with”), otherwise it's an exact match.
You can declare several Production Host Name Patterns, separated by | (no other operators allowed).
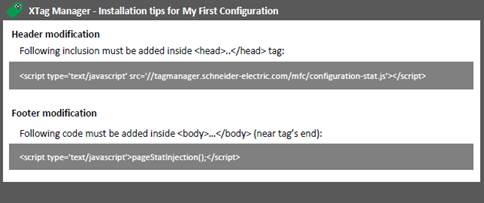
Installation Tips
Generate a PDF with all necessary instructions for Configuration implementation in the Web Application for which it is made.
Common
Single Page Apps
If you have selected On Changed for SPA, footer modification is not required:
Asynchronous Snippet
In some rare cases, Asynchronous Snippet can optimize page load time, however leading to some third-party limitations.
To do so, keywords defer or async can be added to the original header inclusion in order to make the configuration file loaded asynchronously:
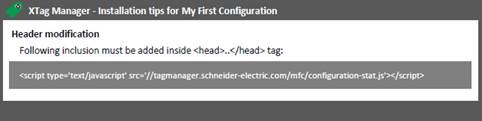
<script type="text/javascript" src="//tagmanager.schneider-electric.com/mfc/configuration-stat.js" async></script>
If any (non SPA), footer snippet must be adapted as following:
<script type="text/javascript">if(window.pageStatInjection)pageStatInjection();</script>
As per to w3c:
· If async is present: The script is executed asynchronously with the rest of the page (the script will be executed while the page continues the parsing).
· If async is not present and defer is present: The script is executed when the page has finished parsing.
· If neither async nor defer is present: The script is fetched and executed immediately, before the browser continues parsing the page.
However, if that will satisfy performance diagnostic tools, most of the time that will have no effect on page rendering time: XTagManager JavaScript is light and doesn’t make synchronous treatments.
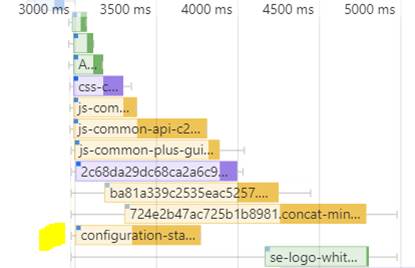
But it can be tried and measured: in the case shown below, the browser parallelizes synchronous loads in page, so while there are others, async won’t decrease page rendering delay:
defer alone doesn’t make the DOM Ready happening earlier, and it is not recommended for the following reasons:
· Some browsers will create a specific group of parallelization for deferred scripts (by keeping their original order), so if they are few it can result in page load time increase.
· pageStatInjection() can happen to soon (before the script is loaded), so the content tag will be postponed to DOM Ready. This can have some impact on traffic volume.
· It can lead to different behavior with old browsers (ignored by IE9), making statistics comparison with recent versions irrelevant.
|
In case of asynchronous snippet, synchronous calls added in Third-Party container will no longer be executed synchronously |
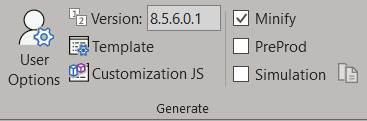
Generate
User Options
Purpose
Define Options that will be used by all your Configurations: your name, Libraries Path, Publisher credentials.
See User Options.
Version
Version of configuration to be generated, as five digits using the following policy:
· Three first digits:
Automatically updated from used library.
· Fourth digit:
Can optionally indicates the last digit of customization file
version. It is automatically reset to zero when previous digits are
changed from library.
· Fifth digit:
Configuration version for the four previous digits: it is
automatically incremented when necessary at publication
time.
Template
Edit the JavaScript Template used to generate the configuration (advanced developers only).
Customization JS
Open the Customization JS file (with the default JS editor setup on your machine) to override default behaviors (for developers only).
This file is generated the first time this command is used, based on the current Analysis selected, so it is recommended to select all those needed before the first call, otherwise some entry points would be missing and would have to be added manually when needed.
It is recommended as well to validate the need of On Changed activation before the first call, in order to add the proper code, otherwise it would also have to be added manually.
Minify
Minify all JavaScript files used by this Configuration and use the compressed version of all Libraries.
Check it to Publish Live, let it unchecked for debugging purposes.
If your try to Publish Live a version not minified, you'll be warned to confirm.
PreProd
Force PreProduction Site/Property to avoid polluting Production one with Live Tests.
A Configuration generated with this option cannot be Published Live.
To get this option enabled, you must have defined the Web Application Host Pattern.
Simulation
Generate a Configuration that can be injected in the Web Application when it has not been installed yet, thanks to JS file included in all application pages, and a Chrome extension (Requestly or Resource Override, + CSP when needed).
Most of the time, with recent Templates, this option is no longer needed to make a Simulation.
However, in some rare cases, Requestly’s Script Injection happens too late: this is when you need to activate it:
A dialog appears: activate “Use Simulation’s door...”, and fulfill it with the URL of a JavaScript file included early in ALL site pages:

Click on OK , then on Update Preview.
|
A Configuration generated with this option cannot be Published Live |
Copy Simulation’s door URL
Copy in clipboard the original Simulation's door URL (without protocol).
While Configuration is not installed, this can be pasted in [Replace] field of Requestly Rule (or [From] field in Resource Override, preceded by protocol or *://).
Preview
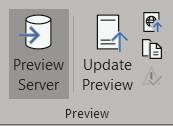
Preview Server
Start/Stop Preview Server (localhost) for testing purpose.
Update Preview
Update Preview Configuration for testing purpose. Note that it doesn't save it, so that you can make different tests without modifying the original one.
Open Preview URL
Open Generated Configuration: in default browser if Preview Server is started, or in default JS editor otherwise.
Copy Preview URL
Copy in clipboard the Configuration Preview URL (localhost).
This can be pasted in [With] field of Requestly Rule (or [To] field in Resource Override, preceded by protocol or *://).
Errors logs
See all Errors logged during last Update or Publication process.
Publish
Publish Live
Save the Configuration and Publish it Live.
The Publisher declines if PreProd or Simulation are activated, and asks for confirmation is Minify is unchecked.
1. You’re asked to enter a description of the version you’re about to publish (it cannot be empty). It will be reported in Versions history, and will be used as Git Commit label:

2. Click on Publish
![]()
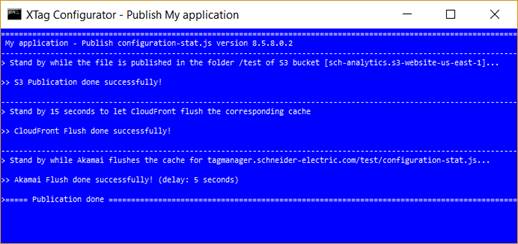
The publication steps are automatically chained, depending on your Publisher settings. Hereafter a publication on S3, with Cloudfront automated flush and Akamaï fast purge:
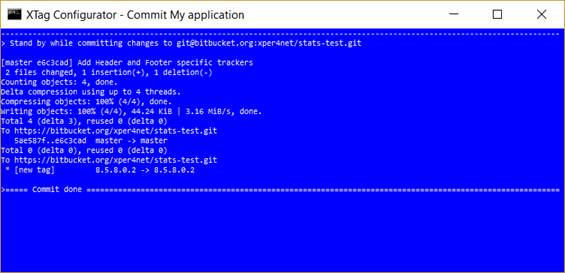
Once Publication done, if there’s a Git Repository linked to this Configuration, a Commit is immediately triggered and the version tagged:
Open Preview URL
Open Live URL in default browser.
Copy Live URL
Copy the Configuration Live URL. Once Configuration installed, this can be pasted in [Replace] field of Requestly Rule (or [From] field in Resource Override, preceded by protocol or *://).
Help

Online Guide
Open this guide.
Scope

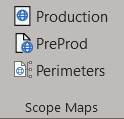
Production
Allows defining Default ATI Production, Default GA Production, or Production Scope Map.
Most of time activated, except when Production storage is already defined elsewhere, for example by the SmartTag library, the CMS, or a Master Configuration.
PreProd
Allows defining Default ATI PreProduction, Default GA PreProduction, or PreProd mapping.
It is recommended to always define PreProduction, in order to avoid Production results polluted by staging tests.
To activate this, you must have defined the Web Application Host Name Pattern. Note that in case of SmartTag library defined for this Configuration, PreProd switching is prevented: to take benefit of it, you must use the built-in SmartTag composer.
Perimeters
Allows defining Default Level 2 or Perimeters:
· As Level 2 for AT Internet,
· As Content Group [Section] for Google Analytics Mirroring (customable default).
Deactivate it when Perimeters and Page names are provided by a Master Container or any other source (CMS), or if you want your site tracked with URLs instead of Page Names.
Activate it in all other cases, including when you want your site tracked without Level 2 (Unclassified).
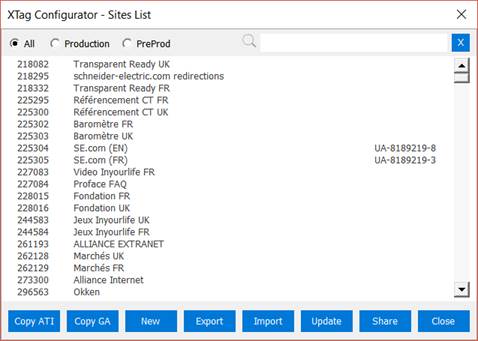
Sites List
Open and manage your AT Internet Sites / Google Analytics Properties Dictionary.
All, Production, PreProd
Filter on the type you need.
Search area
Type letters belonging to the Site name you are searching: the list is immediately filtered on those containing what you’ve typed.
Copy ATI
Copy in the clipboard the numeric ATI Site ID of the selected line. As the dialog is non modal, you can immediately paste this value where you want without closing it.
Copy GA
Copy in the clipboard the GA property of the selected line, if any. As the dialog is non modal, you can immediately paste this value where you want without closing it.
New
Open the Site creation Dialog:
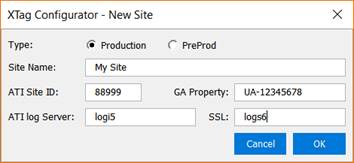
Type
Classify this new Site as Production or PreProd. Than will help filtering the list when it contains a lot of Sites.
Site Name
Report the name as it has been declared in AT Internet.
ATI Side ID
Enter the numeric ATI Site ID.
GA Property
Enter the GA Property corresponding the ATI Site ID.
ATI log Server
Enter the http subdomain of the server collecting data for the ATI Site ID you’ve specified.
You don’t need to enter the full hostname (neither .xiti.com nor .ati-host.net) are required, they will be deducted.
In case of Custom Domain Data Collection, enter the full hostname.
SSL
Enter the https subdomain of the server collecting data for the ATI Site ID you’ve specified.
You don’t need to enter the full hostname: neither .xiti.com nor .ati-host.net are required, they will be deducted.
In case of Custom Domain Data Collection, enter the full hostname.
Export
Export current Sites List in a selected folder, as a file named xtmSites.xlsx.
Import
Replace current Sites List with the one from an Excel file: it must contain a "Sites" Worksheet with Header and six columns:

Note that columns’ names don’t matter, but Worksheet’s name “Sites” does: however, if not found, the first one will be tried.
Update
Update Sites List with additional entries found in Shared List [xtmSites.xlsx.
Only the new ones found in Shared List will be added in local Sites List.
Share
Share additions done, by adding those added in the local Sites List to the Shared List [xtmSites.xlsx], found at location specified in User Options.
Close
Close Sites List dialog without action.
AT Internet
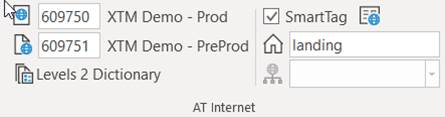
Default ATI Production
Set Default Production AT Internet Site ID, when the Configuration addresses only one.
If several are needed, let it empty and manage Production mapping.
Default ATI PreProduction
Set Default PreProduction AT Internet Site ID.
If several are needed, let it empty and manage PreProd mapping.
Levels 2 Dictionary
Declare the Levels 2 numbers that can be used in Perimeters (those defined in AT Internet for considered Site IDs), and their corresponding names which could feed Google Analytics Content Group [Section] when Mirroring activated.
SmartTag
Use AT Internet SmartTag Library (recommended). When unchecked, xtcore version will be used.
SmartTag URL
Allows using the CDN SmartTag URL, when you need specific options.
Note that doing so, you must ensure by yourself the consistency between the plugins selection achieved in Tag Composer, and all the Analysis selected in this configuration..
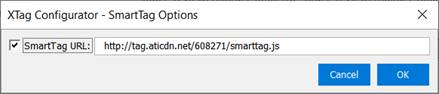
Such CDN SmartTag is downloaded and embedded in the configuration file, then it is refreshed (i.e downloaded again) every week. If you want it refreshed immediately, remove “smarttag.js” in your configuration folder.
Default Page Name
Page Name used for Website root (no Path in URL). It can also be controlled in Perimeters.
Default Level 2
Set Default Level 2, when only one is required. If several are required (common case), let it empty and manager Perimeters.
Google Analytics
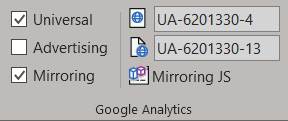
Universal
Use Universal Analytics snippet (recommended).
Advertising
Use Display Advertising snippet (DoubleClick). Not mandatory, and must be avoided in China.
Mirroring
Use Dual tracking engine, mirroring all AT Internet trackers as Google Analytics ones.
If not activated, only the traffic will be captured in GA.
|
This option can lead to exceed the hits limit of free version (10M/month). |
Default GA Production
Set Default Production Google Analytics Property (UA-xxxxxxx-xx).
Default GA PreProduction
Set Default PreProduction Google Analytics Property (UA-xxxxxxx-xx).
You can let it empty if it's the same than Production (not recommended).
Mirroring JS
Create and/or Edit GA Mirroring Customization File.
Preview
Update Preview
See Update Preview.
Open Preview URL
See Open Preview URL.
Save
See Save.
Errors Log
See Errors Log.
Path
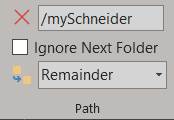
Path Shortener
URL leading path to be ignored for Mapping and Names.
By default, Path folders are used as Chapters names, so this setting allows ignoring recurrent ones that don't bring any useful information.
This removal (as the one below) has an impact on Initial, then on content tag name and all subsequent mappings, except Third-Party which uses Original path.
Example: /sites
Ignore Next Folder
When leading Path above is present, then ignored, do the same for the next folder, whatever it could be.
This option is rarely used, however (originally designed for TeamSite CMS), it can be useful when the folder present after the one defined above is also useless but variable.
Example: when /sites is found as first folder in URL, remove the folder found just after, which contains country.
Final Path
Final Path Pattern to be used by Perimeters map and other Analysis.
|
Initial |
URL Path minus Path Shortener and ignored folder(s). |
|
Customized |
Initial Path Customized for Production. |
|
Remainder |
Customized Path minus Path mapped by Production. |
Scope Maps
Production
Active Production Map [Path to Site/Property], when multiple ATI Sites or GA Properties are required.
Example: one Production Site/Property per Country.
You can also define here their corresponding Containers (GTM or Tag Commander).
PreProd
Active PreProduction Map [Host to Site/Property], when multiple ATI Sites GA Properties are required.
Example: one PreProduction Site/Property per Host: Dev, Integration, UAT, etc...
You can also define in this Map some alternate Web Application host names, when they cannot be declared as patterns.
Perimeters
Active Perimeters Map [Path to: ATI L2 / GA Content Group] and [Page Name Pattern].
Custom Dimensions

Visitor Origin
Track Visitor Origin (External, Internal, Dual) as a Site Custom Variable.
|
ID |
Label |
Meaning |
|
0 |
External |
Visitor is connected outside the internal network. |
|
1 |
Internal |
Visitor is connected inside the internal network. |
|
2 |
Dual |
Visitor has been
connected sometimes outside, sometimes inside during the last 30
days. |
To use it, Internal Pixel URL must be defined in User Options.
Site Variables
Activate/Deactivate Site Custom Variables definition list.
Page Variables
Activate/Deactivate Page Custom Variables definition list.
Click & Events
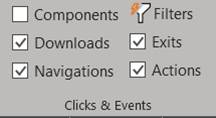
Components
Define the list and the rules of reusable {components} in all Click Types (upcoming feature).
Filters
Allows defining Common Attribute Filters for each Click Type:
A filter is understood as “Target (href) contains filter”.
You can enter them as a list separated by | (OR) or setup more complex filtering with logical operators: + (AND), ! (NOT). You can also filter on other attributes than href.
See FILTERS for detailed syntax and examples.
Then, these predefined filters can then be used in FILTERS columns as $f (optional).
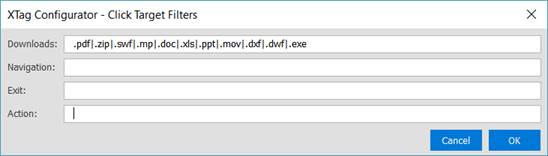
Downloads
Activate/Deactivate Download Clicks tracking, accordingly to defined filters.
If you activate it, a new tab Downloads is displayed for configuration.
Navigations
Activate/Deactivate Inbound Clicks tracking when they have not been identified as Download.
A link is identified as a Navigation one when its target is relative or uses the same host than its page.
Other hosts can be considered as Navigation, but in this case, they must be defined in Customization JS file.
If you activate it, a new tab Navigations is displayed for configuration.
Exit
Activate/Deactivate Outbound Clicks tracking, when they have not been identified as Download nor Navigation.
When a visitor clicks on a link leading to another website, it is considered as an Exit click. See common rules.
If you activate it, a new tab Exits is displayed for configuration.
Actions
Activate/Deactivate other kinds of Click or Event Tracking (buttons, forms, controls, etc..).
Any click can be categorized as Action, but this type is usually reserved for those which are not explicitly Navigation or Exit, like a form submit or a list selection. See common rules.
If you activate it, a new tab Actions is displayed for configuration.
Trackers
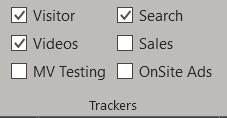
Visitor
Activate/Deactivate Visitor Identifiers and Visitor Categories tracker.
With GA mirroring, Visitor ID is recorded as built-in User ID (usable in User views) plus a User Custom Dimension (usable in all views). Visitor Category is recorded as User Custom Dimension as well, possiblu completed by uploaded data to present its meaning.
If you activate it, a new tab Visitor is displayed for configuration.
Videos
Activate/Deactivate Youtube Videos tracker.
If you activate it, a new tab Videos is displayed for configuration.
|
By default, once this feature activated, all Youtube videos will be tracked so you have to refine the configuration only when you want to limit such tracking to a subset of pages. |
MV Testing
Activate/Deactivate MV Testing module.
Only available when SmartTag option has been selected in Platforms tab.
Search
Activate/Deactivate Internal Search engine tracker: keyword, result pages displayed and clicked result position.
If you enable it, a new tab Search is displayed for configuration.
Sales
Activate/Deactivate Sales tracker (eCommerce), which allows capturing orders and products data
If you activate it, a new tab Sales is displayed for configuration.
OnSite Ads
Activate/Deactivate OnSite Ads trackers. (upcoming feature).
Injection
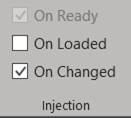
On Ready
Inject Clicks, Events and Trackers once DOM ready.
On Loaded
Redo Clicks and Events Trackers Injection once Page Loaded. To be checked to track controls or data still not present when DOM ready.
If there are contents still not present at this time, a synchronization can be done in Customization JS.
On Changed
When the Web Application uses a Dynamic Technology (Ajax, Angular, React, Vue...), this option allows injecting again all Clicks, Events and Trackers when the URL has changed.
Other change logics and full loading synchronization can be controlled in Customization JS.
Format
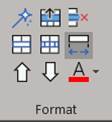
Edit Definition
Edit the Definition Line currently selected (upcoming feature).
Insert Definition Line
Insert a blank Definition above the one currently selected.
If there are Merged Definition Elements in this Line, it will be inserted above the first.
Delete Definition
Delete the Definition Line currently selected. If there are Merged Definition Elements in this Line, all will be deleted, so that you'll be asked for confirmation before.
Merge Common Definition Elements
Merge the Definition Elements currently selected. They must belong to the same column, otherwise you'll be warned.
If merged elements are populated with different values, you’ll be asked to confirm that the first will replace all.
Unmerge Definition Column(s)
UnMerge the Definition Elements currently merged. It can be done on multiple Column selection.
Autofit Columns Width
Activate/Deactivate Automated Columns Width adjustment after each modification.
|
When Autofit is Activated, Undo stack is prevented. |
Move Definition Line Up
Move the Definition currently selected one Line Up, to increase its priority.
Move Definition Line Down
Move the Definition currently selected one Line Down, to decrease its priority.
Font Color
Allows changing the text color of selected Definitions, which can be useful to clarify sections in large Configurations.
Preview
See Preview
Complements

Specific
Activate/Deactivate Specific Code inclusion or Configuration Variables Definitions. See Specific.
Includes
Activate/Deactivate the list of Libraries or Configuration Masters to be included. See Includes.
Third-Party
Asynchronous/Synchronous Tags to be added in Configuration's Container, triggered from Header or Footer. See Third-Party.
It's a better design to manage them with GTM or Tag Commander, except when they require Synchronous or Header implementation.
It can also be used to setup another TMS than GTM or TC, but in this case GDPR will have to be managed with additional customization code.
|
For asynchronous footer tags, use preferably Google Tag Manager / Tag Commander (header or synchronous tags cannot be managed with GTM nor Tag Commander). |
Lookup Tables
Manage Lookup Tables, with the following modes:
· Edit, allowing to modify the Table characteristics and/or to open it once selected
· Creation, once New clicked, allowing to define a new Table.
· Remove, if you no longer need a Table.

Name
· Edit: Select Table name in the dropdown list
· Creation: Type Table’s name. Unexpected characters are filtered on the fly.
Input
Key column name of the Table, just for clarity (no consequences).
Output
Value column name of the Table, just for clarity (no consequences).
Description
Free description of Table’s aim.
New
Switch on Creation mode.
Remove
Remove the Table currently selected (after confirmation).
Cancel
Leave the dialog without action (discard all changes).
OK
· Edit: Open the Table to manage its content.
· Creation: Validate the new Table and open it.
Google Tag Manager
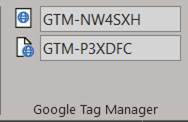
Production GTM Container
Set the Google Tag Manager Container used in Production (GTM-xxxxxx).
PreProduction GTM Container
Set the Google Tag Manager Container used in PreProduction (GTM-xxxxxx).
You can let it empty if it's the same than Production (recommended if your GTM trigger don’t check the host name).
Tag Commander
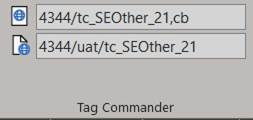
Production Tag Commander Container
Set the Tag Commander Container used in Production, as id/name.
Example: 4343/tc_MyGlobal_21
If you want a cache buster, add: ,cb
PreProduction Tag Commander Container
Set the Tag Commander Container used in Production, usually as id/uat/name.
Example: 4343/tc_MyGlobal_21
If you want a cache buster, add: ,cb
Configurator
About
Display the current version of XTag Configurator.

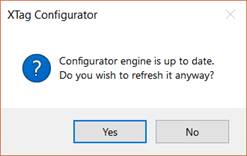
Check Update
An automated version checking is done every week: if you’ve declined it, you can proceed updating the Configurator by clicking there.
If the update is not necessary, you’ll be warned, however you can force it in case your installation has been corrupted.